AWS EC2 Auto Scaling
Setup EC2 Auto Scaling on AWS
Introduction:
In Traditional IT world, there are limited number of servers to handle the application load. When the number of requests increases the load on the servers also increases, which causes latency and failures. Amazon EC2 Auto Scaling helps you maintain application availability and allows you to automatically add or remove EC2 instances according to conditions you define.
Auto Scaling ensures that Amazon EC2 instances are sufficient to run your application. You can create an auto-scaling group which contains a collection of EC2 instances. You can specify a minimum number of EC2 instance in that group and auto-scaling will maintain and ensure the minimum number of EC2 instances. You can also specify a maximum number of EC2 instances in each auto scaling group so that auto-scaling will ensure instances never go beyond that maximum limit.

You can also specify desired capacity and auto-scaling policies for the Amazon EC2 auto-scaling. By using the scaling policy, auto-scaling can launch or terminate the EC2 instances depending on the demand.
Set Up Launch Configuration :
As a pre-requisite, you need to create an AMI of your application which is running on your EC2 instance.
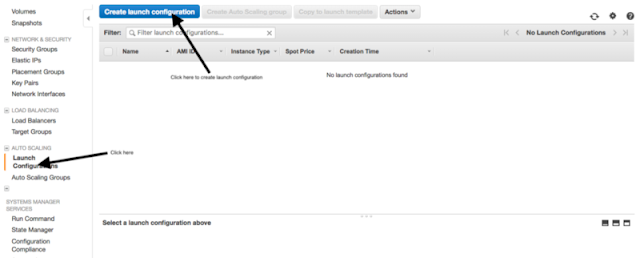
- Go to EC2 console and click on Launch Configuration from Auto Scaling.
- From Choose AMI, select the Amazon Machine Image from My AMIs tab, which was used to create the image for your web application.

- Then, select the instances type which is suitable for your web application and click Next: Configure details.
- On Configure details, name the launch configuration, you can assign if any specific IAM role is assigned for your web application, and also you can enable the detailed monitoring.

After that, Add the storage and Security Groups then go for review and launch.Note: Open the required ports for your application to run.


Set Up Auto Scaling Group :
- From EC2 console click on Auto Scaling Group which is below the launch configuration. Then click on create auto scaling group.
- From Auto scaling Group page, you can create either using launch configuration or Launch Template. Here I have created using Launch Configuration. You can create new Launch Configuration from this page also. Since you had already created the launch configuration, you can go for creating auto scaling group by using “Use a existing launch configuration”.

- After clicking on next step, you can configure group name, group initial size, and VPC and subnets. Also you can configure load balance with auto scaling group by clicking Advanced Details.


After that click on next to configure scaling policies
- On scaling policy page, you can specify the minimum and maximum number of instance in this group. Here you can use target tracking policy to configure the scaling policies. In metric type you can specify such as CPU utilisation and Network In or Out and also you can give the target value as well. Depending on the target value the scaling policy will work. You can also disable scale-in from here.


You can also use Step and simple scaling policies.


It works based on alarm, so first create the alarm by clicking on ‘add new alarm’.


Here the alarm created is based on CPU utilisation above 65%. If CPU utilisation crosses 65% the auto scaling launches new instances based on the step action.


You can specify more step actions based on your load, but in simple policy you can’t categorise depending on the percentage of CPU utilisation. Also you need to configure scale-in policies once the traffic become low, as it reduces the billing.


- Next click on ‘Next: Configure Notification’ to get the notification based on launch, terminate, and fail etc. to your mail ID, and enter the tag and click on ‘Create auto scaling group’.
Note: You need to create an Elastic Load balancer on top of an auto scaling group.
- by Anshita Gupta
email - anshita.techycardia@gmail.com
Comments
Post a Comment